How to stop stringing in 3D prints: Get the ultimate fix guide for Cura, Prusa & Orca. Fix retraction settings, oozing, & webbing.
What Causes Stringing?
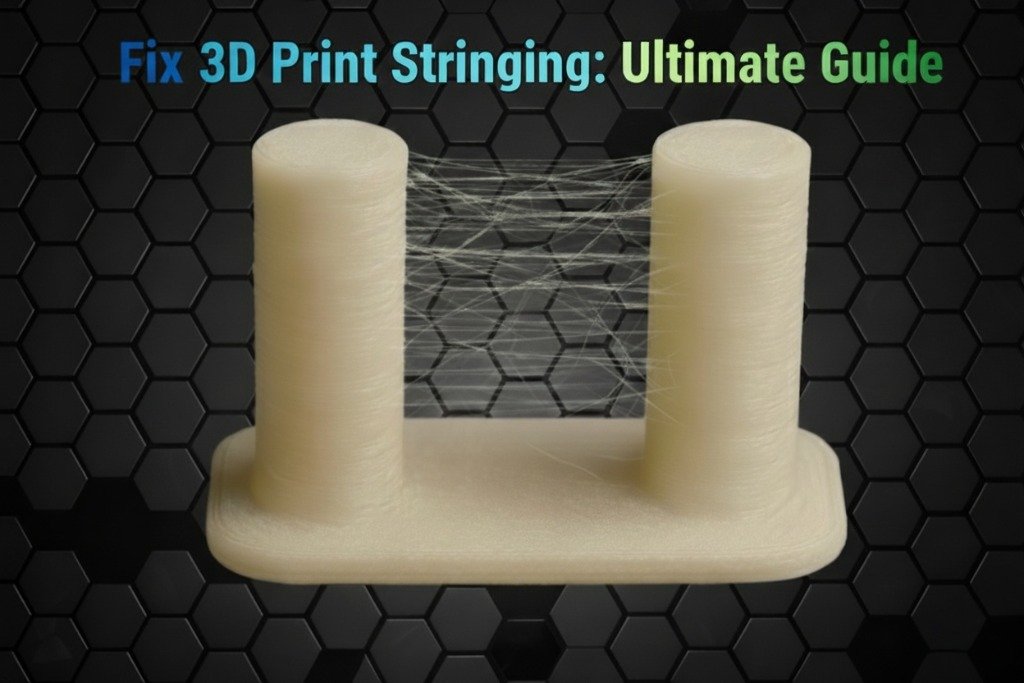
Stringing happens when molten filament oozes out of the nozzle while the printer head moves between different parts of your model. This is most common during travel moves when the extruder moves without printing. The key to fixing this is controlling that oozing with two main settings: retraction and temperature.
1. Retraction Settings
Retraction is the most critical setting for combating stringing. When the printer head finishes a section of your model and prepares for a travel move, the extruder motor pulls the filament back a short distance into the nozzle. This creates a small vacuum, stopping the molten plastic from oozing out. If your retraction settings aren’t dialed in correctly, you’ll see stringing.
- Retraction Distance: This is how far the filament is pulled back. If the distance is too short, it won’t be enough to relieve the pressure and stop the ooze. Too long, and it can cause clogs or grinding of the filament. A good starting point is typically 0.5-2 mm for direct drive extruders and 2-6 mm for Bowden setups.
- Retraction Speed: This determines how quickly the filament is pulled back. A speed that is too slow won’t be effective at stopping the ooze in time. Too fast, and it can cause the filament to snap or strip. A common range is 40-60 mm/s.
2. Printing Temperature
The temperature of your hotend has a direct impact on how easily the filament can flow. If your temperature is too high, the filament becomes less viscous and more prone to oozing, even with retraction. This is one of the most common reasons for stringing, especially with PLA and PETG filaments.
- Hotend Temperature: A temperature that is too high will cause the filament to become excessively runny. Lowering your print temperature by 5-10°C is often a quick and effective fix for stringing. It’s a good practice to perform a temperature tower test to find the optimal temperature for your specific filament brand and type.
Let’s dive into the specific settings for each slicer.
Cura Stringing Fix: Essential Settings
Cura is beginner friendly slicer in the 3D printing world, but its default settings might not be perfect for your specific printer or filament. To fix stringing, you’ll focus on the Travel section. Stop stringing in 3D prints:
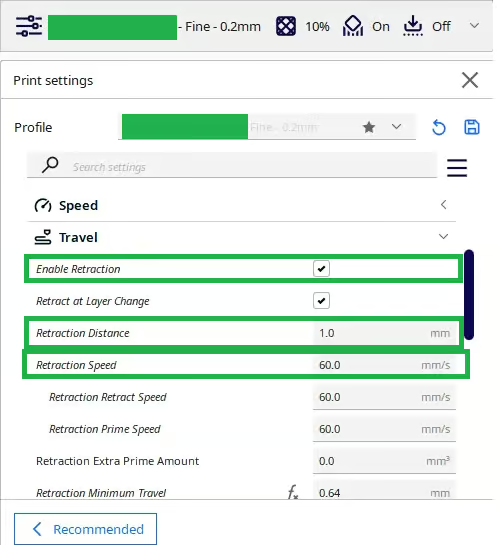
- Retraction Distance: This is the length of filament the extruder pulls back into the hotend. A longer distance is needed for Bowden setups, while a shorter distance is best for Direct Drive systems.
- Cura Setting: Find it under
Travel-> Retraction - Actionable Advice: Start by increasing the value in small increments (0.5 mm at a time). A good starting point is 2-6 mm for Bowden and 0.5-2 mm for Direct Drive.
- Cura Setting: Find it under
- Retraction Speed: This determines how quickly the filament is pulled back. A faster speed can prevent oozing more effectively.
- Cura Setting: Found right next to Retraction Distance.
- Actionable Advice: Begin with a speed of 30-45 mm/s. If stringing persists, you can increase it to 60 mm/s or higher, but be careful not to go too high, as it can cause grinding on the filament.
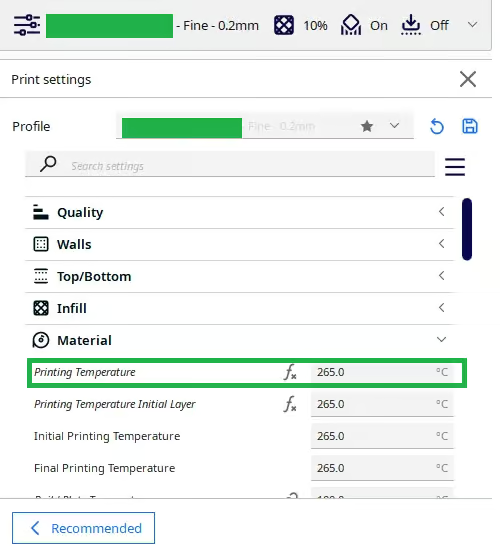
- Printing Temperature: A filament’s temperature directly impacts its viscosity. Printing too hot is a leading cause of stringing.
- Cura Setting: Material -> Printing Temperature.
- Actionable Advice: Find the temperature recommended by your filament manufacturer, then try lowering it by 5°C increments until you find the sweet spot that reduces stringing without causing under-extrusion.
Prusa Slicer Stringing Fix: Essential Settings
Prusa Slicer‘s retraction settings are straightforward and highly effective. Stop stringing in 3d Prints:
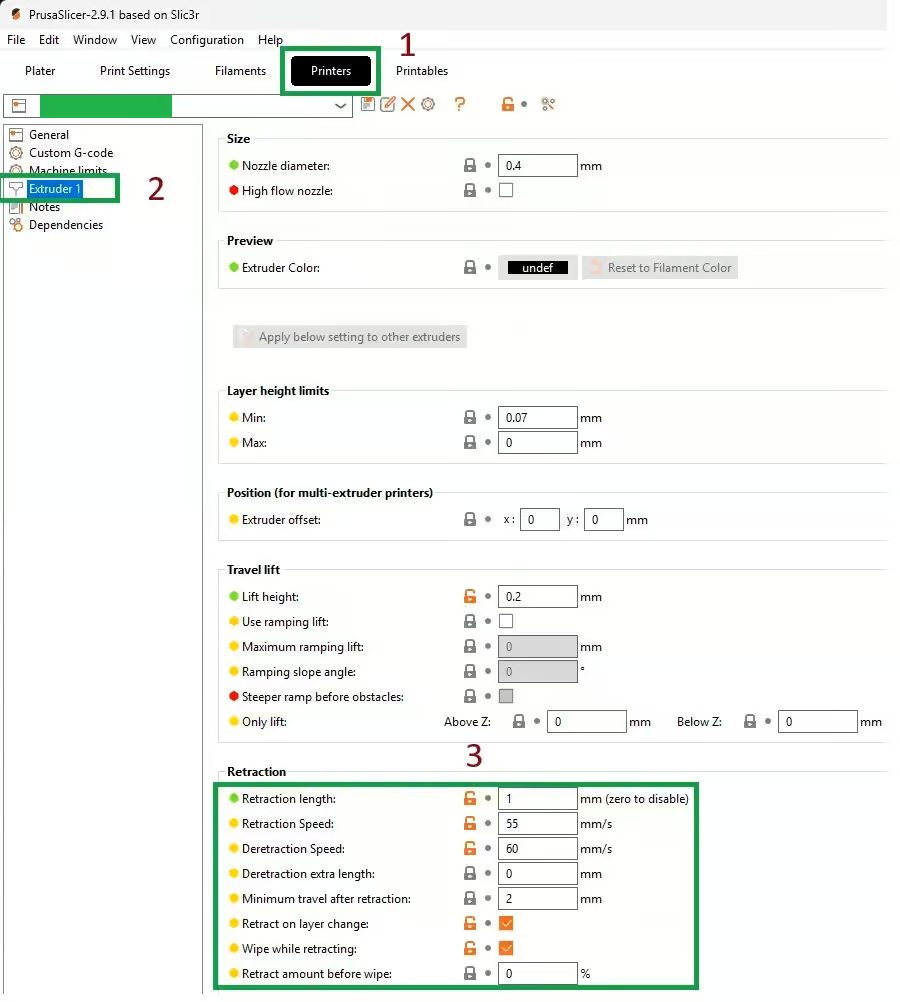
- Retraction Length: This setting is your primary tool for combating stringing.
- PrusaSlicer Setting: Navigate to Printer Settings -> Extruder 1 tab.
- Actionable Advice: As with Cura, adjust this value based on your extruder type. Begin with 2-6 mm for Bowden systems and 0.5-2 mm for Direct Drive.
- Retraction Speed: How fast the filament retracts makes all the difference.
- PrusaSlicer Setting: Located directly below Retraction Length.
- Actionable Advice: A speed between 30-50 mm/s is a great starting point for most printers.
- Wipe while retracting: This is a crucial, often overlooked setting in PrusaSlicer. It forces the nozzle to perform a small, final wiping motion while retracting, cleaning any remaining oozing plastic.
- PrusaSlicer Setting: Printer Settings -> Extruder 1 -> Retraction.
- Actionable Advice: Ensure this option is enabled. It can be a game-changer for stubborn stringing issues.
Bambu Studio And Orca Slicer Stringing Fix: Essential Settings
Orca Slicer and Bambu Studio takes a more advanced, data-driven approach. While the core settings are similar to PrusaSlicer, Orca’s built-in calibration tools make it easy to find perfect settings without endless test prints. Stop stringing in 3d Prints:
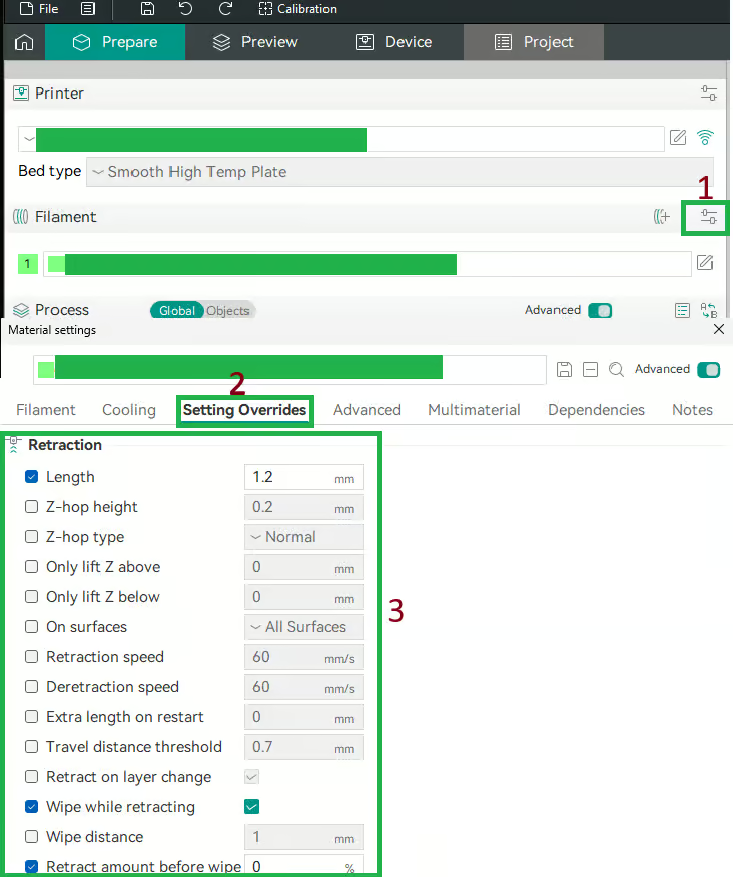
- Retraction Settings: These settings are located in the Filament Settings tab.
- Orca Slicer Settings: Filament Settings -> Settings overrides. Look for Retraction Length and Retraction Speed.
- Actionable Advice: Use the same starting values as PrusaSlicer: 2-6 mm for Bowden and 0.5-2 mm for Direct Drive.
- Built-in Calibration Tools: This is where Orca Slicer truly shines. It provides automated test prints to help you dial in your settings.
- Orca Slicer Tool: Navigate to the top menu bar, click on Calibration, and select Retraction Test or Temp Tower.
- Actionable Advice: Run the Retraction Test first. It will automatically print a tower with varying retraction lengths, allowing you to visually see which setting works best for your setup. Next, run a Temp Tower to find the ideal printing temperature for your specific filament.
When Retraction and Temperature Fail: Try This
If you’ve optimized your retraction and temperature but still see stringing, it’s time to look at secondary causes:
- Wet Filament: This is a common, but often overlooked, cause. Filament that has absorbed moisture will boil in the hotend, creating steam that forces molten plastic out.
- Actionable Advice: Use a dedicated filament dryer or a convection oven set to the appropriate temperature for your material.
- Travel Speed: If the printer head moves slowly, it gives the filament more time to ooze.
- Actionable Advice: Increase your Travel Speed (found in the
Speedsettings of your slicer) to 150 mm/s or higher to minimize the time spent between parts.
- Actionable Advice: Increase your Travel Speed (found in the
Final Thoughts
No matter which slicer you use, fixing stringing is all about systematic fine-tuning. Start with a solid retraction distance and speed, then adjust your printing temperature. For Cura and PrusaSlicer, this requires a bit of trial and error with test prints. If you’re using Orca Slicer, take advantage of its powerful built-in calibration tools to get perfect results in minutes.
Happy printing!