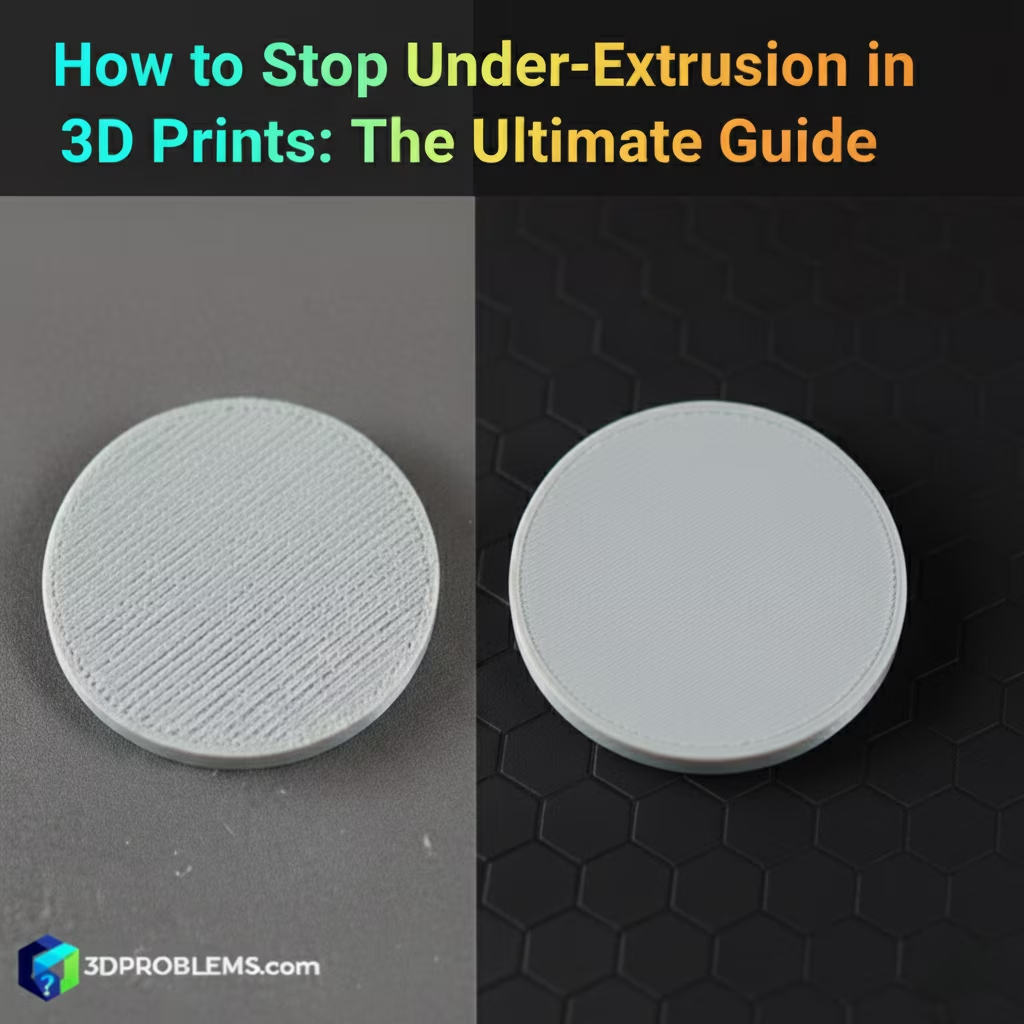
Struggling with 3D print under-extrusion? Our ultimate guide helps you diagnose and permanently stop under-extrusion for flawless 3D prints.
The key to eliminating under-extrusion is ensuring a consistent and adequate flow of filament through the hotend.
What Causes Under-Extrusion?
Under-extrusion occurs when the amount of plastic extruded by the nozzle is less than what the slicer expects. This is primarily caused by factors that either restrict filament flow or incorrectly calibrate the amount of filament being fed.
The fundamental process is:
- Filament Path Issues: Obstructions or friction in the filament’s path from the spool to the nozzle.
- Nozzle Problems: Clogs, partial clogs, or incorrect nozzle size.
- Temperature Issues: Insufficient hotend temperature preventing proper melting.
- Extruder Problems: Skipping, grinding, or incorrect steps per mm.
- Slicer Settings: Incorrect flow rate, filament diameter, or retraction settings.
The primary factors you need to fix under extrusion are Filament Delivery (smooth, unobstructed path), Melt Flow (correct temperature and nozzle), and Slicer Calibration (accurate settings).
Cura Under-Extrusion Fix: Essential Settings
Cura settings are primarily found under the Quality, Material, Speed, and Extruder sections.
1. Check Filament Diameter
- Actionable Advice: Verify your filament’s actual diameter with calipers (it’s often not exactly 1.75 mm or 2.85 mm). Enter this precise value into Cura. An incorrect value is a common cause of under-extrusion.
2. Flow Rate (Extrusion Multiplier)
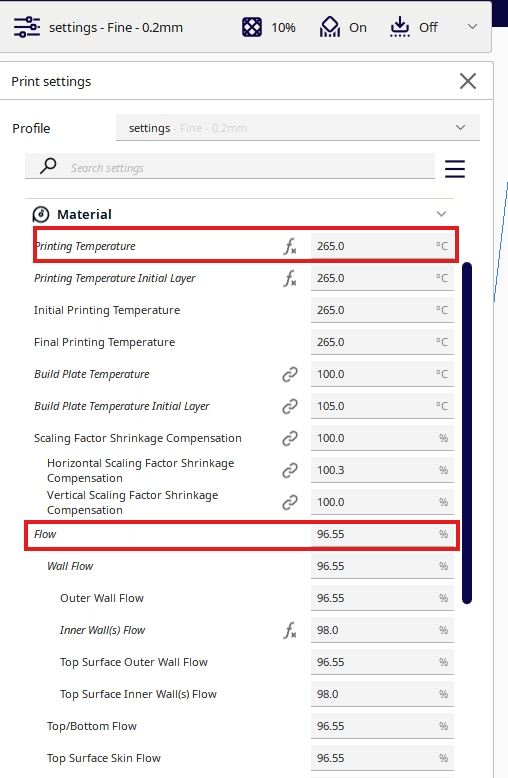
- Cura Setting: Found under Material -> Flow.
- Function: This setting is a multiplier that directly adjusts the amount of plastic extruded. A value below 100% will cause under-extrusion.
- Actionable Advice: For persistent under-extrusion, try increasing the Flow by 2-5% at a time. It’s best to calibrate this with a simple single-wall test cube to find the perfect value.
3. Printing Temperature
- Cura Setting: Found under Material -> Printing Temperature.
- Function: Controls the hotend temperature, which determines how easily the filament melts and flows through the nozzle.
- Actionable Advice: Increase your Printing Temperature by 5-10°C within the filament’s recommended range. Too low a temperature can lead to insufficient melting and increased resistance, causing under-extrusion.
4. Retraction Settings (Distance & Speed)
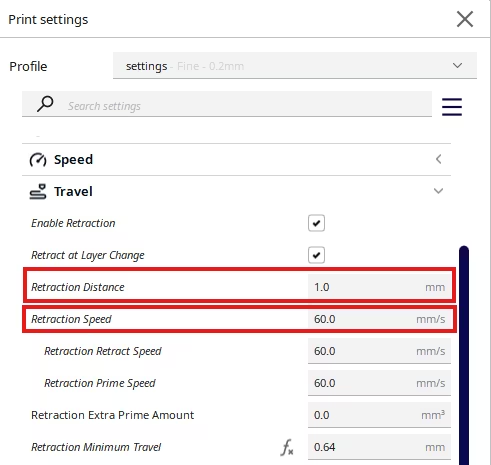
- Cura Setting: Found under Travel -> Retraction Distance and Retraction Speed.
- Function: If retraction distance is too high or speed is too fast, it can create air gaps or cause ‘heat creep’ (filament melting too high up in the hotend), leading to under-extrusion after a travel move.
- Actionable Advice: If under-extrusion occurs after retraction, try reducing the Retraction Distance by 0.5-1 mm or decreasing the Retraction Speed by 5-10 mm/s.
PrusaSlicer Under-Extrusion Fix: Essential Settings
PrusaSlicer settings are located in the Filament Settings, Printer Settings, and Print Settings tabs.
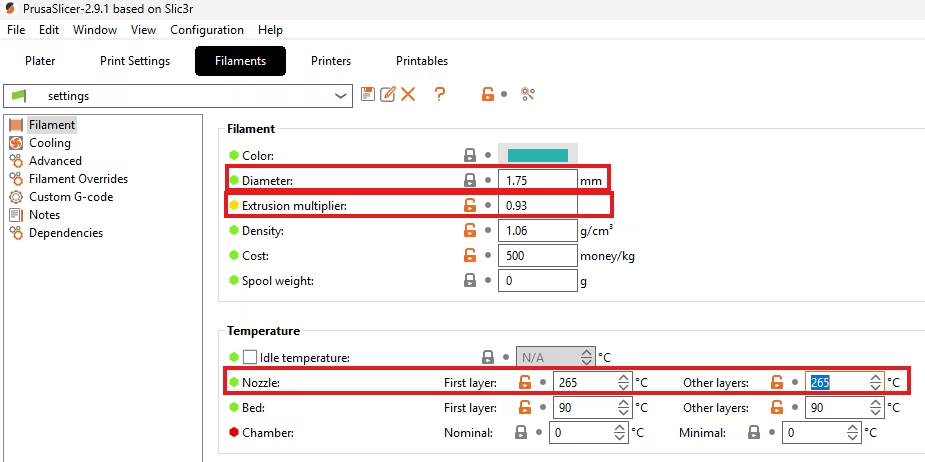
1. Filament Diameter
- PrusaSlicer Setting: Navigate to Filament Settings -> Filament tab. Look for Diameter.
- Function: Informs the slicer about the precise thickness of your filament, critical for accurate volume calculations.
- Actionable Advice: Measure your filament diameter with calipers and input the exact value. Even a small discrepancy can lead to under or over-extrusion.
2. Extrusion Multiplier
- PrusaSlicer Setting: Navigate to Filament Settings -> Filament tab. Look for Extrusion multiplier.
- Function: This is a direct scaling factor for the amount of plastic extruded. A value less than 1 (100%) will cause under-extrusion.
- Actionable Advice: Increase the Extrusion multiplier by 0.02-0.05 (equivalent to 2-5% in other slicers) and print a single-wall test cube to dial it in.
3. Nozzle Temperature
- PrusaSlicer Setting: Navigate to Filament Settings -> Filament tab. Look for Nozzle temperature.
- Function: Controls the hotend temperature, affecting how easily and consistently the filament melts and flows.
- Actionable Advice: Increase the Nozzle temperature by 5-10°C. Always stay within the filament’s specified temperature range.
4. Retraction Settings
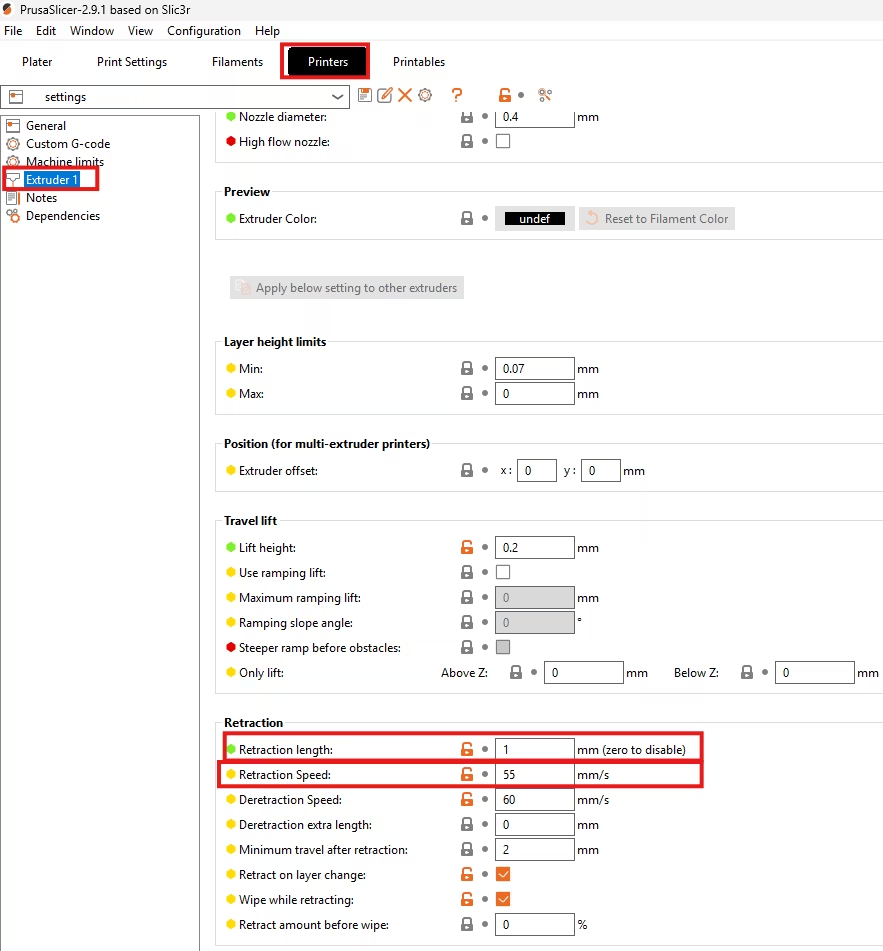
- PrusaSlicer Setting: Navigate to Printer Settings -> Extruder 1 tab. Look for Retraction length and Retraction speed.
- Function: Incorrect retraction can cause temporary under-extrusion by either pulling too much filament back or causing filament grinding.
- Actionable Advice: If under-extrusion is observed immediately after a travel move, slightly reduce the Retraction length (e.g., by 0.5 mm) or reduce the Retraction speed (e.g., by 5-10 mm/s).
Orca Slicer Under-Extrusion Fix: Essential Settings
Orca Slicer (and Bambu Studio) offers detailed settings and powerful calibration tools.
1. Filament Diameter
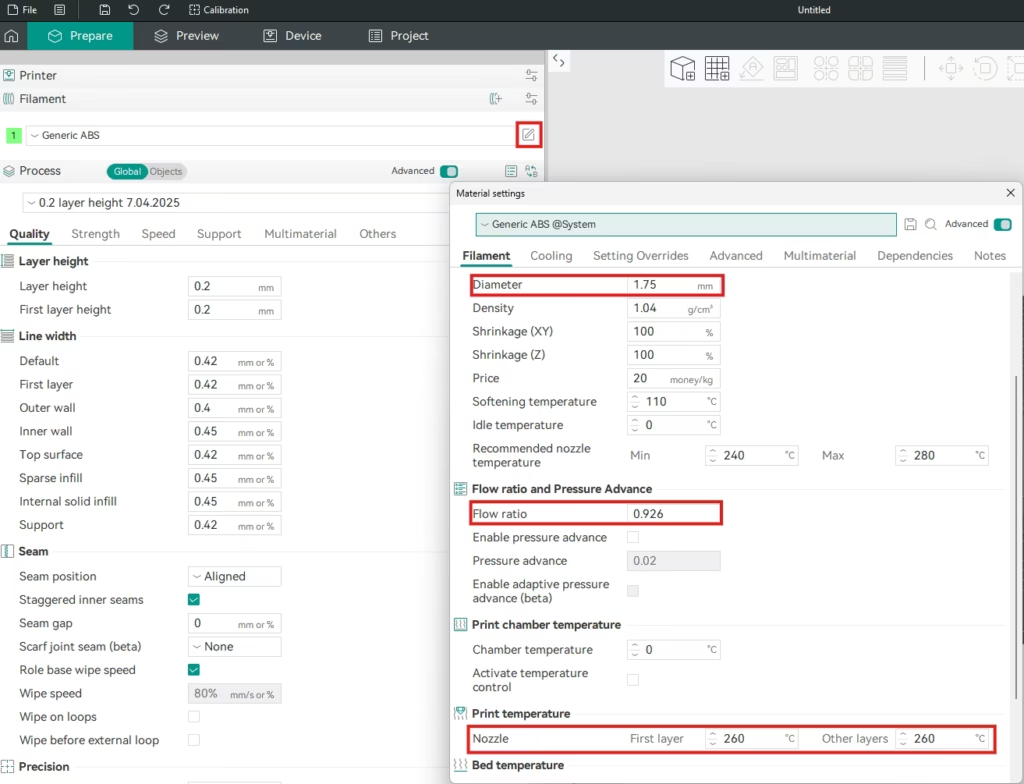
- Orca Slicer Setting: Navigate to Filament Settings -> Filament tab. Look for Diameter.
- Function: Specifies the diameter of the filament for accurate volumetric extrusion calculations.
- Actionable Advice: Precisely measure your filament’s diameter with calipers and enter the value. This is fundamental for correct extrusion.
2. Flow Rate (K-Factor / Extrusion Multiplier)
- Orca Slicer Setting: Navigate to Filament Settings -> Flow Ratio tab. Look for Flow ratio.
- Function: The Flow Ratio directly scales the amount of filament extruded. Orca also has Pressure Advance (K-Factor) under Filament Settings -> Advanced which affects extrusion at corners, but Flow Ratio is the overall volume.
- Actionable Advice: If you suspect global under-extrusion, increase the Flow ratio by 0.02-0.05. Use Orca’s built-in Flow Rate Calibration tool (under Calibration menu) for precise tuning.
3. Nozzle Temperature
- Orca Slicer Setting: Navigate to Filament Settings -> Print Temperature tab. Look for Nozzle temperature.
- Function: Controls the melting point of the plastic in the hotend, ensuring it can flow without excessive resistance.
- Actionable Advice: Increase the Nozzle temperature by 5-10°C. Use Orca’s Temp Tower Calibration tool for precise temperature optimization.
4. Retraction Settings
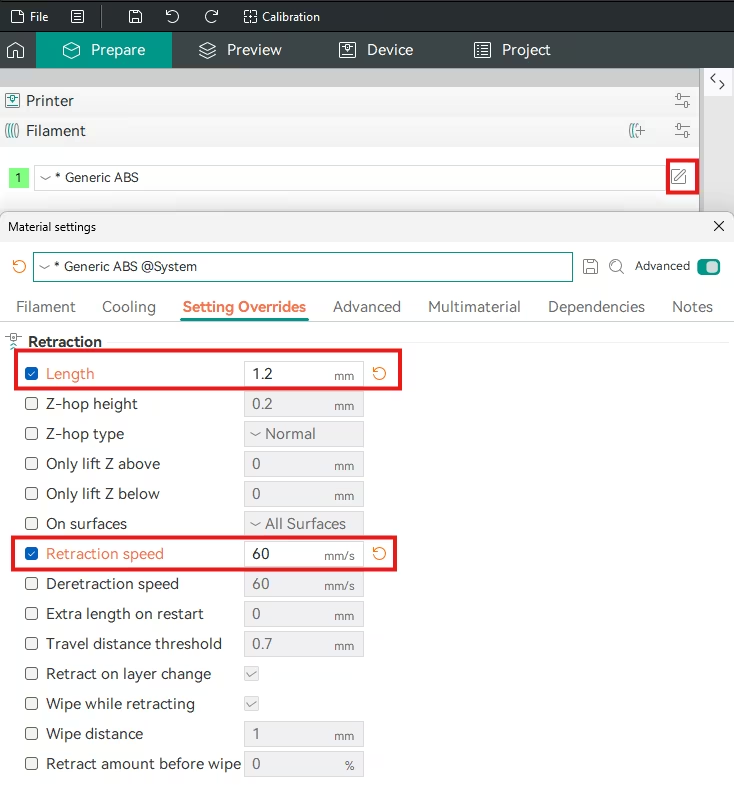
- Orca Slicer Setting: Navigate to Filament Settings -> Setting Overrides tab. Look for Retraction length and Retraction speed.
- Function: Excessive retraction can lead to ‘air printing’ after travel moves or even cause clogs by pulling molten plastic too high into the cold zone.
- Actionable Advice: If under-extrusion is seen after retractions, try reducing the Retraction length by 0.5 mm increments or reducing the Retraction speed. Orca’s Retraction Test under Calibration can help optimize these
Universal Non-Slicer Fixes (Must-Do)
If the above settings fail, the issue often lies with the hardware:
- Calibrate E-Steps:
- Filament Accuracy: This setting dictates how much filament your extruder motor pushes through the hotend.
- Direct Cause: An incorrect (too low) e-step value is a primary cause of under-extrusion, as the printer thinks it’s pushing enough filament, but isn’t.
- Measure and Tune: Follow our detailed E-Step Calibration Guide to measure and adjust this value correctly.
- Check for Clogs:
- Cold Pull: Perform a cold pull to remove any debris from the nozzle.
- Nozzle Replacement: If a clog is stubborn, replace the nozzle. Nozzles wear out over time.
- Heat Creep: Ensure your hotend fan is running efficiently to prevent heat creep, which can cause clogs in the heat break.
- Inspect Extruder:
- Tighten Idler: Ensure the extruder idler arm (the part that presses the filament against the drive gear) has enough tension.
- Clean Drive Gear: Clean any plastic dust or debris from the extruder drive gear teeth.
- E-steps Calibration: Calibrate your E-steps (steps/mm for the extruder motor) to ensure it’s pushing the correct amount of filament. This is a one-time calibration unless you change extruder hardware.
- Filament Path:
- Check for Snags: Ensure the filament spool can unroll freely and the filament isn’t snagging on anything.
- Bowden Tube Inspection: For Bowden setups, ensure the tube isn’t kinked, damaged, or has excessive friction. The PTFE tube should be seated firmly against the nozzle inside the hotend.
- Wet Filament: If filament has absorbed moisture, it will boil in the hotend, causing inconsistent extrusion and popping sounds.
- Dry Filament: Use a filament dryer or a convection oven at a low temperature to dry out your filament.